Menu
Screen Printing as a Manufacturing Process
It is the simplicity of the screen printing process that makes it as attractive as a manufacturing process. If you have a need to lay down controlled thicknesses of material over a closely specified area screen printing could be your ideal solution.
The initial criteria are to create a mixture of the material in the form of a liquid or paste that you wish to deposit onto a substrate. The ranges of materials that suit this are vast. From chocolate to ceramic in solutions of sugared water to sulphuric acid. Of course conventional inks consist of a pigment (solid,) solvent (liquid,) resin (dissolved in the solvent) and additives These will dry with the application of heat and moving air. Other systems use Ultra-Violet energy or occasionally Electron Beam or even Microwave energy. Whichever system is used the aim is to create a dried and cured film that is fit for purpose.
Having decided what material you want to deposit and that it can be formulated so that it will pass through a mesh stencil or a stencil mask (More on these later,) you next need to consider how you are going to dry and or cure the material. This will depend on its end use and the required condition of the substrate after drying and or curing. Substrates can be rigid, flexible solid or woven. They even have been known to be hard deep frozen when printed flexible when at room temperature and hard ceramic when fired. The key is that at the point of print the substrate has to be stable. A woven textile is extremely flexible but it is held so that it is stable when it is printed.
Already we have a huge array of options in terms of material to deposit, substrate and curing techniques. So let us address the issue of mesh stencil or stencil mask.
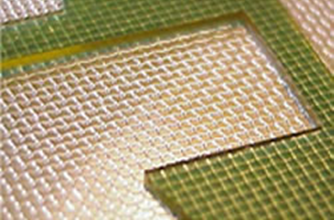
A mesh stencil is the most common form of stencil. The image is created using a photosensitive emulsion that is coated onto the mesh and then dried. Conventionally a photopositive is attached to the coated mesh and then the coated mesh is exposed to Ultra Violet light. The exposed area hardens and the unexposed area is washed out with water creating a very accurate image area that allows the material printing medium to pass through the myriad mesh openings onto the substrate. There are alternative methods of creating the image using Computer to Screen systems.
Mesh Stencil
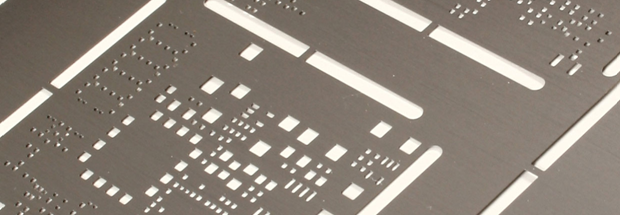
A Stencil mask has no mesh but consists of a metal plate that has the image area cut out normally with a laser or chemically etched. Stencils masks are widely used in the deposition of solder pastes in Surface Mount Technology (SMT).
Stencil Mask
The mesh stencil is the most adaptable of the methods and the stencil mask is used mainly where paste or higher viscosity materials have to be applied.
With a mesh stencil it is possible to apply a 0.300 mm film thickness and sometimes higher, with a stencil mask it can be significantly more than this but the printing medium must be suitable. The printing mechanism of mesh stencils allows higher speed printing up to 4500 sheets per hour as against stencil masks only hundreds per hour. Speeds are dependant a whole range of factors, particularly drying and curing. It is unwise to assume a production speed before the project has been considered in depth. If you intend to use screen printing as a mass production deposition process you must take into account the need to formulate the material so that it is suitable for printing. If you don’t know how to do so there are companies who can help you.
Some of the Materials Currently Screen Printed
- Ceramics
- Chocolate
- Magnetic Iron
- Electrically Conductive
- Dielectrics
- Cement
- Enzymes
- Aluminium
- Platinum
- Oxides
- Ink
- Silver
- Acids
- Graphite
- Gold
- Alkalis
- Antibiotics
- Dyes
- Silicone
- Adhesives
- Solder Paste
- Resist
- etc
If your material is not in this list don’t worry, if it can be suspended in a solution or paste it is likely that it is printable.
In industrial applications the drying and curing element of the process is crucial. Sometimes it is necessary to dry materials in inert atmospheres such as nitrogen. In less complex applications it is still necessary to apply the drying mechanism in a very controlled fashion as this can affect the final characteristics of both the printing medium and the substrate. Modern dryers provide data on the conditions throughout the dryer. In some cases cooling or air-conditioning is used to bring the substrate and ink back to room temperature. One of the main constraints in drying and curing is time. The length of the dryer and the speed of transport through the dryer directly affect the print speed. This assumes that drying takes place inline with the print. Occasionally it is necessary to dry offline in static ovens but this should be avoided where possible. There are many different solutions to inline drying and curing. When printing onto sheets dryers can take the form of horizontal conveyor ovens or wicket dryers. In roll to roll applications vertical multi-pass dryers are used. There are many different solutions intended to provide the necessary drying/curing conditions for a prescribed time.
For any ink (printing medium) to achieve an acceptable bond to the substrate it must be capable of wetting the substrate. That means that the ink must have a lower surface tension than the surface energy of the substrate (ideally 10 Dynes difference,) if it is not so the ink will not flow onto the surface and may not even transfer. Pre-treatment of the substrate to increase the surface energy may be necessary or wetting agents need be added to the ink. Pre-treatment methods include flaming, corona discharge, plasma or even liquid priming.
Getting back to the basics of screen printing as stated before the process appears very straight forward but like every process the secret is reducing the variables and maintaining precise process control. The biggest variable is generally the printing medium. Having a consistent mix at all times is obvious but people who use the process have an unfortunate habit of altering the mix on the printing press by adding thinners or other additives that in turn screw up the whole process. Any changes must be controlled by weight and recorded and their effects noted down. My advice is to mix your printing medium and use it in volumes that mean no adjustments ever take place on the press. This will often mean you have to control the ambient conditions.
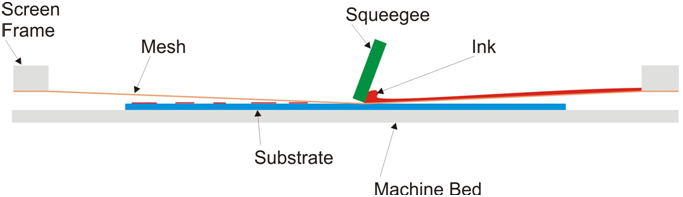
The core of the process is the printing mechanism, with the most commonly used meshed stencil this is as follows:
Basic Items
The basic items required to carry out the screen process printing are:
Stencil: This is a structure that consists of a frame onto which a mesh is attached under tension. The mesh is coated or covered with a photosensitive material. The image to be printed is created photographically on the stencil leaving open areas of mesh through which ink passes. The stencil is also known as “the screen”.
Squeegee: a flexible polyurethane blade, held in a rigid mount or handle. This causes the ink to flow into the mesh.
Printing Medium/Ink: Can take the form of a wide range of solids or dyes suspended in a fluid. A large range of ink chemistries is available to suit a vast range of applications.
Substrate: This is a general term for the surface that is to be printed. The surfaces can range from bread to bio-medical sensors.
Machine: the machine base provides a surface for the substrate to be printed and the upper section secures the screen. Ideally, movement should be possible between substrate and screen.
The graphic shows screen-printing in its most basic form. From this highly sophisticated equipment has been developed and is used in a host of different applications.
Functions of Component Parts
Flood Coater
In this graphic we see the flood coater (not shown on the Basic Screen Printing Machine graphic) first charges the mesh openings with ink.
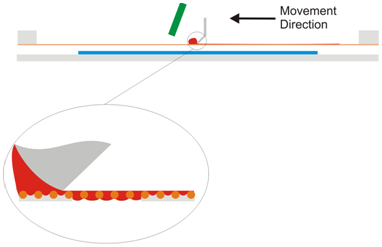
The Squeegee
The squeegee presses down on the stencil and brings the stencil into contact with substrate. Closing the “off contact gap.” The squeegee moves across the stencil. Causing ink to flow into the stencil openings and removing excess ink from the top of the stencil.
The Squeegee Closing The Off Contact,
And Moving Across The Stencil
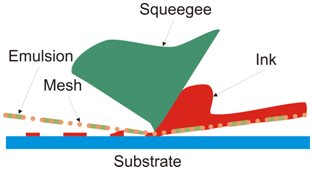
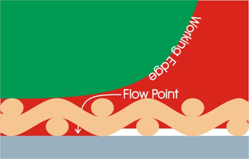
The tip of the squeegee is the working edge where the ink flow is directed into the mesh and displaces ink that has already been pushed there by the flood coater the ink is now in contact with the substrate.
Ink Substrate Relationship
A temporary bond is formed by means of the relationship between the surface energy of the substrate and the surface tension of the ink. The ink wets the substrate.
Temporary Bond Caused by Surface Tension/Energy

As the squeegee moves away, the tension in the mesh pulls the stencil away from the ink film. This temporary bond draws ink out of the mesh openings and leaves a film of ink on the substrate. The squeegee removes any ink that may be left on top of the stencil.
It the substrate is dirty or the surface energy is lower than or close to the surface tension of the ink there will not be a complete transfer of ink and some if not all will be left in the mesh openings resulting in poor quality print. Equally if the mesh tension is low and takes time to pull the mesh away from the ink then ink will be retained in the mesh openings resulting is an uneven film of ink.
Whenever you think about screen printing no matter what equipment you are using think about what is happening at the point where the stencil is in contact with the substrate.
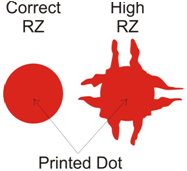
The roughness of the print side of the stencil can have a significant effect on edge definition and the shape of a printed dot or line. The print side of the stencil has to act as a gasket and stop the ink leaking out from the image area. The roughness of the print side of the stencil is known as the Rz. If the Rz is wrong for that image it will destroy image quality.
Effect of Poor RZ on Dot
Poor RZ on Dot
There are many variables in screen printing and how you manage them will determine how successful you are. This is intended to be an introduction but by understanding the basics you stand a much better chance of getting it right.
Using a Laser Cut or Chemically Etched Stencil Mask
In the previous section we have examined the basics of conventional screen printing where a mesh is used as the support and ink flows in and out of he mesh openings to create the image and the image itself has to be continuous. There are applications where this is not required and the need is to put down blocks of printing medium that is generally a paste rather than a liquid. This is often the case in the electronics industry particularly with Surface Mount Technology (SMT.)
The principle of operation with stencil masks is different to that of conventional screen. The stencil is normally made from stainless steel and is as thick as the intended finished wet film thickness. The mechanism for depositing the film is similar in that there can be a squeegee and a flood coater but their function is different as is the sequence of operation.
The stencil is first brought into contact with the substrate with a vertical downward movement. The flood coater comes into contact with the stencil and paste is pulled across the stencil and into the open areas of the stencil. The flood coater lifts and the squeegee then moves in the opposite direction forcing paste into the open areas of the laser cut stencil. When the squeegee finishes its stroke the stencil and rest of the mechanism lifts vertically leaving the paste lying on the substrate. There has to be an attraction between the paste and the substrate for this to occur. The aim is to provide and even coat of paste over closely defined areas. Sometimes a flood coater is not used just a squeegee that provides both functions. Low viscosity materials such as conventional inks are not suitable as the printed structure would be unstable and would collapse.
In some cases instead of using a squeegee which can be made of polyurethane or metal the squeegee is replaced by a “pumped Squeegee” this is where the printing paste is contained in a chamber with a slot in the base. The chamber is slightly pressurised and the slot moves across the stencil. The paste that is under a slight pressure flows out of the chamber through the slot and into the open areas of the stencil. The adhesive bond is formed and the stencil lifts leaving the paste on the substrate. The paste has to be formulated such that it maintains the profile of the open area of the stencil.
The stencil mask can be a sophisticated piece of engineering with specialist materials, a range of processes used in manufacture and different dimensional tolerances for each process and material combination. Deciding what combination is suitable for your application requires expert advice. The profile and condition of the holes in the stencil mask will affect the final deposit. But it is the rheology of the printing medium (paste) that is the most critical.
The graphics of the processes in this introductory article show them in much simplified form. The need to have dimensional control of all aspects of the process to within a few microns takes them into the area of high precision engineering.
Applications for screen printing include:
- Biomedical sensors
- In-mould transfers
- Printed Electronics
- SMT
- Solar cells
- Gaskets
- Capacitors
- Potentiometers
- Container printing
- Ceramics
- Direct textile printing
- Textile transfers
- Membrane switches
- Electroluminescence
- Glass decoration
- Heated windscreens
- Printed circuit boards
- Product identification
- RFID
- Leather printing
- Product decoration